Contents
- 1 Introduction
- 2 Setting up for standalone measuring
- 3 Switching to standalone mode
- 4 Starting standalone measuring
- 5 Monitoring a standalone measuring scope
- 6 Adding an existing standalone instrument
- 7 Viewing measurements
- 8 Advanced standalone instrument settings
- 8.1 Measurements
- 8.2 Monitoring enabled
- 8.3 Mode
- 8.4 Measuring
- 8.5 Name
- 8.6 Host
- 8.7 Password
- 8.8 Measurements path
- 8.9 Measurements full path
- 8.10 Measurements download mode
- 8.11 Delete
- 8.12 State
- 8.13 Alias
- 8.14 Event actions
- 8.14.1 Name
- 8.14.2 Triggers
- 8.14.3 Hold off time
- 8.14.4 Hold off on unviewed
- 8.14.5 Action
- 8.14.6 Sound file
- 8.14.7 Subject
- 8.14.8 Message text
- 8.14.9 Address
- 8.14.10 Attach file
- 8.14.11 Filename
- 8.14.12 Command
- 8.14.13 Working directory
- 8.14.14 Test
- 9 Event action Command examples
Introduction
Versions of the WiFiScope WS6 - 1000XM with option L are capable of performing standalone measurements. The instrument needs to be connected via LAN or WiFi mode, the Power/Mode button must switched on.
The instruments can be setup to perform a specific measurement and then started. They will then perform the measurements and store the measurements on an internal solid state disk. Then no longer a connection with a computer is required to perform the measurements. As long as the instrument is powered, it will perform measurements. When the power is interrupted, the instrument will be powered from its own battery and continue measuring. When the battery is empty, the instrument will stop. When power comes back, the instrument will start up again and will resume measuring.
Using the Multi Channel oscilloscope software, the status of the instruments can be monitored via LAN or WiFi, measurements can be downloaded and events can be generated when the instrument has performed a measurement. When the network connection is interrupted, the instrument remains measuring and storing the measurements internally. When the network connection is restored, monitoring will take place again and notifications of new messages will be sent.
To use the instrument as standalone instrument and monitor it using the Multi Channel oscilloscope software, 4 steps are required:
- Setup the instrument for the specific measurements it has to perform
- Switch the instrument to standalone mode
- Start measuring on the standalone instrument
- Monitor the instrument using the Multi Channel oscilloscope software
Setting up for standalone measuring
To setup an instrument for standalone measuring, first connect it to a computer running the Multi Channel oscilloscope software, via LAN or WiFi. Setup the instrument to perform your measurement, e.g. by loading a previously saved .TPS file from disk.
Then right-click the instrument in the Object screen and select from the popup menu.
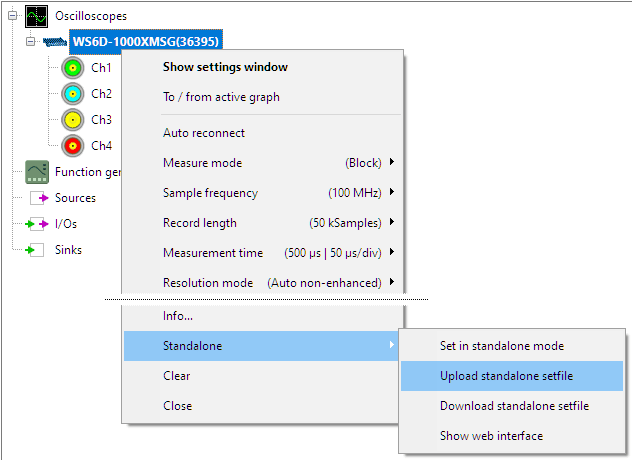
This will upload the current measurement settings of the instrument to a setting file inside the instrument, for standalone use.
Switching to standalone mode
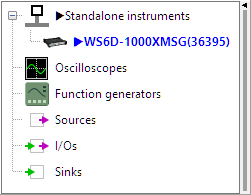
Now the instrument can be set in standalone mode, by right-clicking the instrument in the Object screen and selecting from the popup menu. The instrument is now switched to standalone mode and no longer directly controlled by the Multi Channel oscilloscope software. It is removed from the Oscilloscopes section in the Object screen.
A new section Standalone instruments is added to the Object screen, to which the instrument is now added.
Starting standalone measuring
Right-clicking the standalone instrument in the Object screen and selecting Show settings window will open the settings window for the standalone instrument.
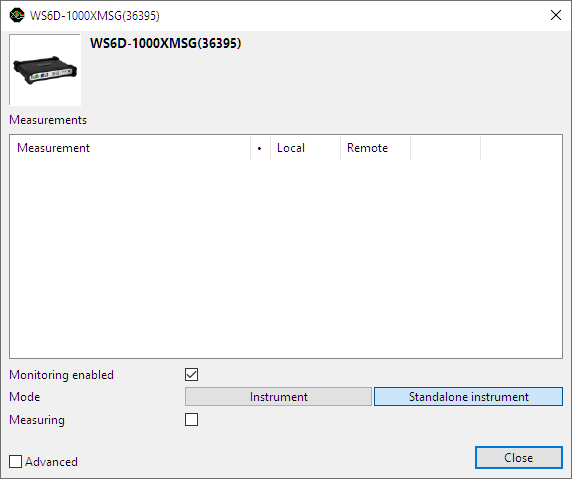
Placing a check in the Measuring checkbox will start measurements on the standalone scope. When a measurement is performed, the measured data will be automatically stored to the internal storage space in the instrument itself. The Measurements list in the settings window will show all measurements, with date and time stamp and instrument serial number. This storage can hold 10000 measurements or 30 GByte of data, whichever limit is reached first. When this number is exceeded and a new measurement is performed, the oldest measurement will be removed and the new one stored. The instrument can generate a notification when a measurement is performed.
Monitoring a standalone measuring scope
The Multi Channel oscilloscope software can monitor one or more standalone measuring instruments. These instruments are listed in the Object screen, with their name, alias and status.
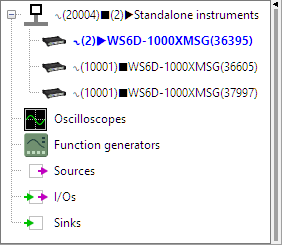
When more standalone instruments are being monitored, they are all listed with their respective status symbols. One instrument can be made active instrument, by clicking it once in the Object screen. This instrument is shown in blue.
The following status symbols are being used:
 The standalone instrument is initializing
 Measurements performed, 2 unviewed measurements
 The standalone instrument is measuring
 The standalone instrument is not measuring
 The standalone instrument is not connected
The Standalone Instruments section title shows a status summary of all instruments. In the image above, there are 20004 unviewed measurements, there are two instruments measuring and one instrument is not measuring.
Right-clicking a standalone instrument in the list will show a popup menu, from which the standalone instrument settings window can be opened, various settings can be changed and the instrument web interface can be opened.
Adding an existing standalone instrument
When one or more standalone instruments are available on the network, but not listed in the software yet, they can be added via the Manage instruments window. To open the window, select menu .
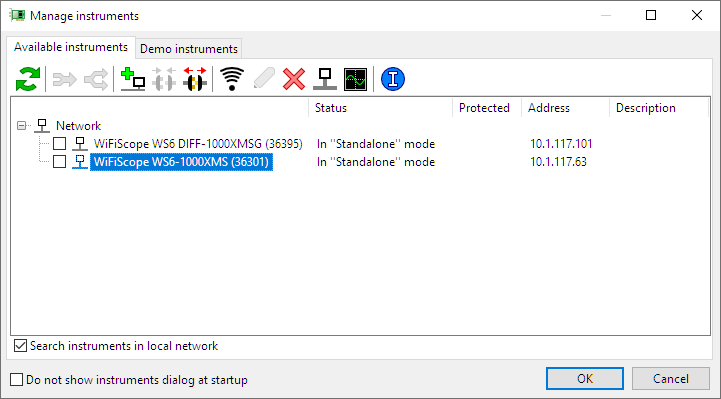
To add a standalone instrument to the monitored list, locate the instrument and click it once to select it (becomes blue).
Next click the
![]() To Standalone mode button to add the instrument.
To Standalone mode button to add the instrument.
Using the
![]() To instrument mode button, a selected standalone instrument can be switched to normal instrument, no longer measuring standalone.
To instrument mode button, a selected standalone instrument can be switched to normal instrument, no longer measuring standalone.
Viewing measurements
To view measurement performed by the standalone instrument, a toolbar is available in the main window:
![]()
![]()
![]()
![]()
![]()
![]()
Using the buttons on the toolbar, it is possible to navigate through the stored measurements and view them. The toolbar acts on the active standalone instrument, the one shown in blue in the list. A demo instrument similar to the actual instrument will be created in the software, to show the measurement results.
The following buttons are available:
-
 view the first measurement
-
 view the previous measurement
-
 view the next measurement
-
 view the last measurement
-
 clear the current measurement view (the measurement itself is not deleted)
-
 show the settings window with the list of all measurements
Depending on the selected Measurements download mode the measurement is copied from the instrument or moved from the instrument.
In the settings window, a measurement can be viewed by double-clicking it.
Advanced standalone instrument settings
Placing a check in the Advanced checkbox will show all advanced settings in the settings window.
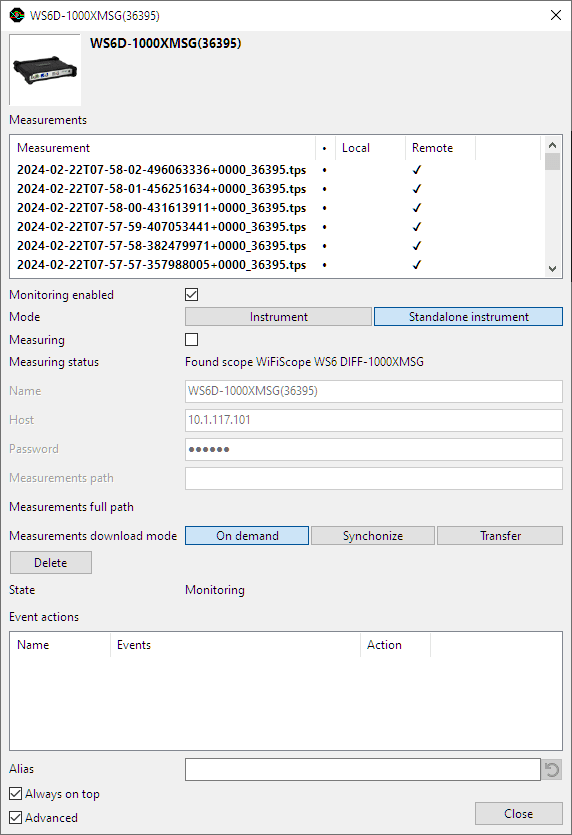
Additional settings become visible, which are usually only set once.
Measurements
The Measurements list shows all saved measurements on the standalone instrument. It functions just like a mailbox in an e-mail program. New measurements, that have not been viewed yet, are shown in bold face and have a bullet in the second column, indicating it is new. A check mark in the Local column and/or the Remote column indicates whether the measurement is present in the local storage location and on the standalone instrument.
Right-clicking a measurement in the list will open a popup menu with the following options:
| Option | Description |
|---|---|
| Delete | This deletes the measurement, both locally and remotely. |
| Viewed | This sets the measurement as viewed. It does not transfer a measurement to the local storage location. |
| Unviewed | This sets the viewed measurement as unviewed. |
Monitoring enabled
The setting Monitoring enabled determines whether the Multi Channel oscilloscope software is monitoring the standalone instrument. When the software is monitoring the standalone instrument, it is not possible to change certain settings of the instrument.
Disabling this setting stops the Multi Channel oscilloscope software monitoring the standalone instrument, making it possible to change the settings of the instrument. After changing these settings, Monitoring enabled must be enabled again in order to have the Multi Channel oscilloscope software monitor the standalone instrument.
Mode
The setting Mode determines whether the instrument operates as standard instrument (controlled by the Multi Channel oscilloscope software) or as standalone instrument.
Measuring
The checkbox Measuring determines whether the standalone instrument is measuring or not.
Name
For standalone instruments that are located outside the local network, it may not be possible to properly request the instrument name. In this field a name to recognize the instrument can be entered. In order for the software to discriminate between instruments, the entered name must be unique.
This setting can only be changed when Monitoring is disabled.
Host
When a standalone instrument is to be monitored that is not present in the local network, the Multi Channel oscilloscope software will not be able to automatically locate it. By entering the IP address of the instrument here, the instrument can be detected by the software and then be monitored.
This setting can only be changed when Monitoring is disabled.
Password
In order to connect to a standalone instrument in a different network, its password is required. It can be entered here.
This setting can only be changed when Monitoring is disabled.
Measurements path
As the name of a standalone instrument outside the local network may not be properly requested, the software cannot automatically generate a path to store the measurements locally. The location on the computer where measurements will be stored can be set using Measurements path.
This setting can only be changed when Monitoring is disabled.
Measurements full path
The Measurements full path indicator shows the full path of the location where the measurements for this standalone instrument are stored locally.
Measurements download mode
When the standalone instrument performs a measurement, it is stored internally in the instrument. Depending on the selected Measurements download mode the following is done:
| Mode | Action |
|---|---|
| On demand | When a remote measurement is accessed, it is transferred to the computer and stored in the specified location. The measurement also remains present remotely on the instrument. |
| Synchronize | When a measurement is performed, the local storage location will be synchronized with the instrument. The measurement is stored remotely but also transferred to the local storage location. |
| Transfer | When a measurement is performed, the measurement is directly transferred to the local storage location. The measurement is removed from the instrument. |
Delete
The button Delete makes the Multi Channel oscilloscope software stop monitoring the instrument. It will no longer be listed in the list of standalone instruments in the Object screen.
State
The indicator State shows the current state of the standalone instrument.
| State | Description |
|---|---|
| Initializing | the standalone instrument is initializing |
| Monitoring | the standalone instrument is being monitored by the software |
| Disabled | the standalone instrument is not being monitored by the software |
| Connecting | the standalone instrument is connecting to the network |
| Connected | the standalone instrument is connected to the network |
| Disconnected | the standalone instrument is disconnected from the network |
| Changing directory | the local storage directory is being changed after a pad change |
| Changed directory | the local storage directory is changed after a pad change |
| Scanning directory | the content of the local directory is being scanned |
| Scanned directory | the content of the local directory is scanned |
| Directory error | an error occurred while scanning the local directory |
Alias
A standalone instrument is normally listed with its official name and serial number. For clarification, a standalone instrument can be given an Alias, e.g. defining the location it is situated. This makes it easier to recognize instruments. The listing in the Object screen will also show the alias in the instrument name.
The Alias is also used in the path where the measurements are stored locally.
Event actions
For each standalone instrument it is possible to generate events when something in the state of the instrument changes. These state changes include that a measurement is performed, that a measurement is downloaded, that the instrument was disconnected, or reconnected, etc. Possible events that can be generated are showing a Windows message, generating a sound, sending an e-mail, add an entry in a log file etc.
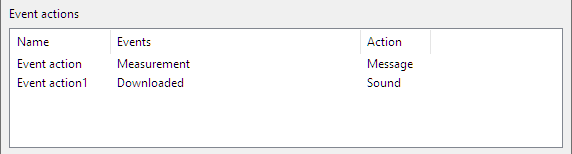
Right-clicking the Event action list, shows a popup menu with the following options:
| Option | Description |
|---|---|
| Add | This adds a new event action to the list |
| Edit | This opens the event action settings window |
| Delete | This removes the event action |
Right-clicking a specific event action and selecting Edit or double-clicking the event action will open the Event action settings window, in which the event action can be configured.
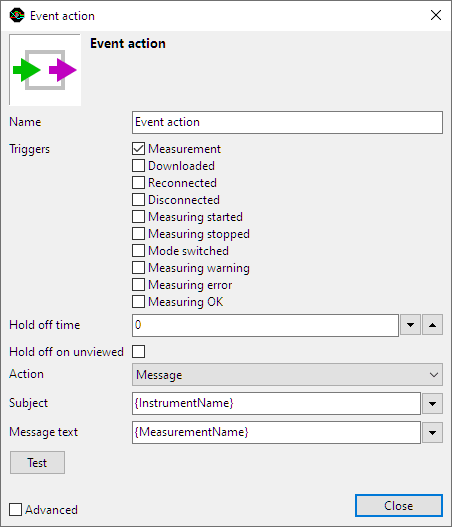
Depending on the selected trigger(s) and action, one or more of the following settings can be adjusted.
Name
The setting Name sets the name of the Event action.
Triggers
The setting Triggers defines what event in the standalone instrument will trigger an event. Multiple triggers can be selected. Available triggers are:
| Trigger | Description |
|---|---|
| Measurement | activates when a measurement is performed |
| Downloaded | activates when a measurement is downloaded |
| Reconnected | activates when the instrument is reconnected to the network |
| Disconnected | activates when the instrument is disconnected from the network |
| Measuring started | activates when measuring is started |
| Measuring stopped | activates when measuring is stopped |
| Mode switched | activates when the Instrument / Standalone Instrument mode is switched |
| Measuring warning | activates when a measuring warning occurs |
| Measuring error | activates when a measuring error occurs |
| Measuring OK | activates when measuring is OK |
Hold off time
To avoid that too many events are generated in a short time, a hold-off time can be set, in seconds, in which no new events will be generated. Once an event is generated, the hold-off timer will start running and during that time, no new event will be generated.
Hold off on unviewed
When the setting Hold off on unviewed is enabled, only one event will be generated when one or more new measurements are performed on the standalone instrument. Only when all measurements are viewed and a new measurement is performed, a new event will be generated.
Action
The setting Action defines what kind of event is generated after a trigger:
| Action | Description |
|---|---|
| Sound | play a sound on the computer monitoring the standalone instrument |
| Message | show a Windows message on the computer monitoring the standalone instrument |
| send an e-mail to a specific address | |
| Log to file | log an entry to a log file |
| Command | execute an external command |
For the e-mail option it is required that an e-mail program is installed on the computer and that it is properly configured to send e-mails.
Sound file
The setting Sound file allows to select a sound file from the Windows sound system, to be played when the event is triggered.
This setting is only available when Action Sound is selected.
Subject
The setting Subject sets the subject of a Windows message or an e-mail that is sent when the event is triggered. Custom text can be entered, as well as one or more predefined variables, like e.g. Instrument name, Measurement name, Event, etc.
This setting is only available when Action Mail or Action Message is selected.
Message text
The setting Message text sets the message body of a Windows message or an e-mail that is sent when the event is triggered. Custom text can be entered, as well as one or more predefined variables, like e.g. Instrument name, Measurement name, Event, etc.
This setting is only available when Action Mail or Action Message is selected.
Address
The setting Address allows to set an e-mail address where a message will be sent to when the event is triggered.
This setting is only available when Action Mail is selected.
Attach file
The checkbox Attach file determines if the measurement that is downloaded is attached to the e-mail that will be sent.
This setting is only available when Action Mail is selected, in combination with Trigger Downloaded.
Filename
The setting Filename sets the file name of the log file where an entry is logged when the event is triggered. Custom text can be entered, as well as one or more predefined variables, like e.g. working directory, instrument name, etc.
This setting is only available when Action Log to file is selected.
Command
The setting Command sets the name of a Windows batch file that is to be executed when the event is triggered. Custom text can be entered, as well as one or more predefined variables, like e.g. Instrument name, Measurement name, Event, etc.
This setting is only available when Action Command is selected.
Working directory
The setting Working directory sets the working directory where a command must be executed, in case of an event. Custom text can be entered, as well as one or more predefined variables, like e.g. working directory, instrument name, etc.
This setting is only available when Action Command is selected.
Test
The button Test activates the event, to verify that all settings are correct.
Event action Command examples
One option to let the software do when a measurement is performed and downloaded, is to convert the measured data into a CSV file, for further processing. The Multi Channel oscilloscope software itself can be used for that, using command line parameters.
To do that, an event action Command is used, triggered when the measurement is downloaded. An example is given below:
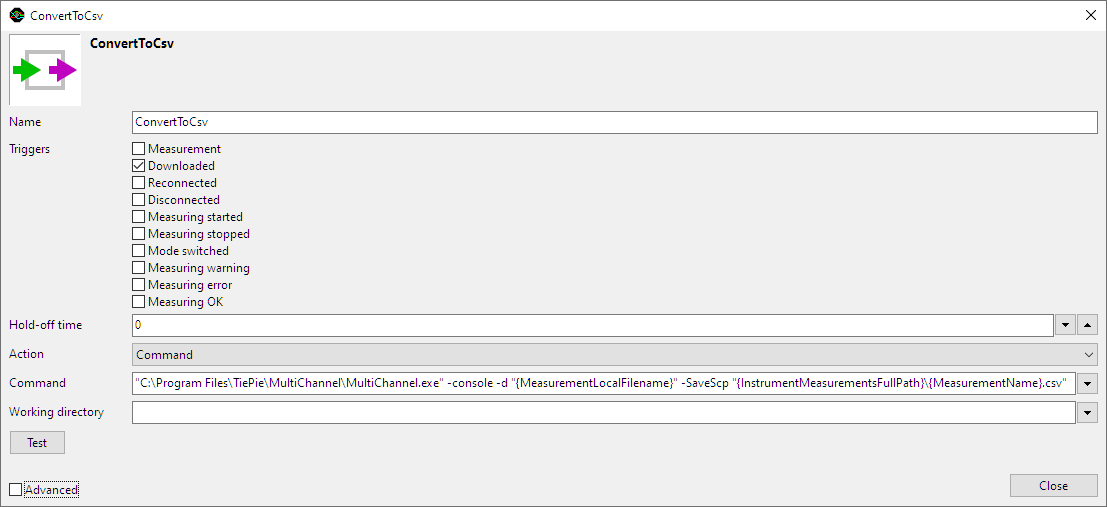
- The name of the event is ConvertToCsv, as given by the user
- It is triggered by Downloaded
- The action to perform is a Command
The command that will be executed is:
"C:\Program Files\TiePie\MultiChannel\MultiChannel.exe" -console -d "{MeasurementLocalFilename}" -SaveScp "{InstrumentMeasurementsFullPath}{MeasurementName}.csv"
When a measurement needs to be converted to CSV but then also something else needs to be done, a batch file can be used:
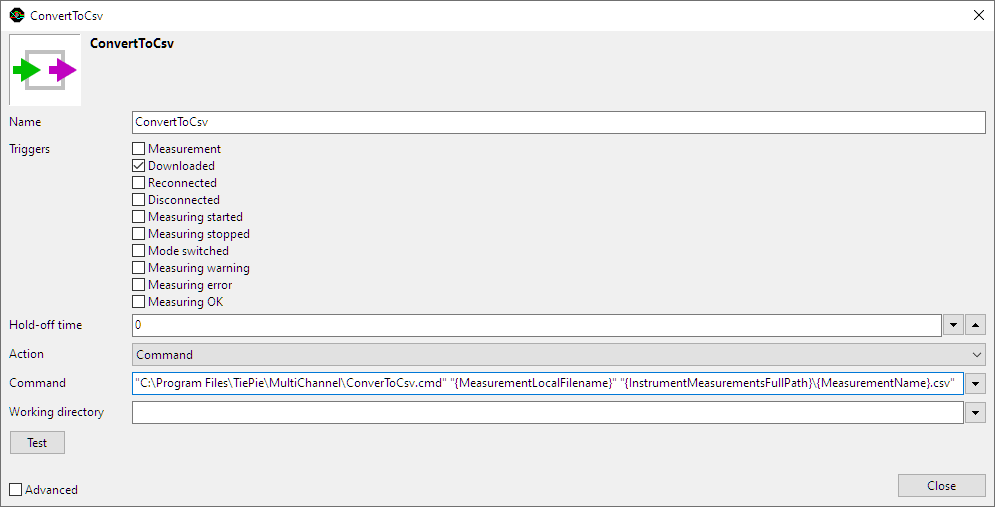
The command used is:
"C:\Program Files\TiePie\MultiChannel\ConverToCsv.cmd" "{MeasurementLocalFilename}" "{InstrumentMeasurementsFullPath}{MeasurementName}.csv"
The content of the batch file ConvertToCsv.cmd is:
rem usage: ConverToCsv ‹filename to convert› ‹Result filename›

"C:\Program Files\TiePie\MultiChannel\MultiChannel.exe" -console -d %1  -SaveScp %2

rem test %ERRORLEVEL% to see if command executed without errors.

rem put here your own commands