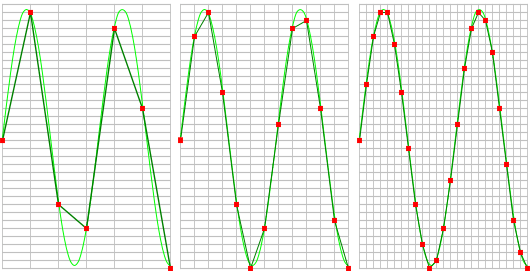
The rate at which samples are taken by the oscilloscope is called the sample frequency, the number of samples per second. A higher sample frequency corresponds to a shorter interval between the samples. As is visible in the picture below, with a higher sample frequency, the original signal can be reconstructed much better from the measured samples.

The sample frequency must be higher than 2 times the highest frequency in the input signal. This is called the Nyquist frequency. Theoretically it is possible to reconstruct the input signal with more than 2 samples per period. In practice, at least 10 to 20 samples per period are recommended to be able to examine the signal thoroughly in an oscilloscope. When the sample frequency is not high enough, aliasing will occur.
Changing the sample frequency of an instrument in the Multi Channel oscilloscope software can be done in various different ways:
-
Clicking the Sample frequency indicator
 on the channel toolbar and selecting the required sample frequency
from the popup menu
-
Opening the instrument settings dialog using the
 Instrument settings dialog button and selecting the required sample frequency in the dialog.
-
Clicking the decrease/increase sample frequency buttons
 and
and
 on the instrument toolbar
- Using hotkeys F3 (lower) and F4 (higher).
-
Clicking the Sample frequency label in the combined Record length + Sample frequency +
Resolution indicator
 on the instrument toolbar and selecting the
required value from the popup menu.
- Right-clicking the horizontal scrollbar under the graph displaying signals from the instrument and selecting Sample frequency and then the appropriate value in the popup menu.
- Right-clicking the instrument in the Object screen, selecting Sample frequency and then the appropriate sample frequency value in the popup menu
